How to Animate a 3D Model
There are four main ways to make a 3D model move. Some take skill and hours. Some take a sentence and a few minutes. This guide shows each one, step by step, so you can pick the right tool for your project.
By the Bake3D teamUpdated 7 min read
Short answer
To animate a 3D model, first give it a rig (a skeleton inside the mesh). Then pose the rig over time in one of four ways. Set keyframes by hand, apply a ready-made motion from a library, record real movement with motion capture, or describe the motion in words and let a tool create it. Export the result as GLB or FBX with baked keyframes.
How we checked this: The export options, frame rates and preset names come from Bake3D's own studio and API. The Blender steps follow the current Blender manual. Third-party motion libraries and capture tools are described from their public documentation, not from our own benchmark.
Animation is just change over time. A pose at one moment, a new pose a moment later, and the computer fills the gap. The hard part is getting good poses and good timing. The four methods below differ in who makes those poses: you, a library, a real performer or a program that reads your words.
Step zero: does your model need a rig?
Ask one question first. Does any part of the model bend?
- No, it moves as one piece. A coin, a crate, a spaceship or a car body can be animated by moving the whole object. Skip the rig.
- Yes, parts bend or swing. Legs, arms, tails, wings, necks and faces need a rig. A rig is a skeleton of joints inside the mesh, plus skin weights that tell the surface how to follow each joint. Read what rigging is if the idea is new.
- Only the face changes. Shape keys, also called blend shapes, may be enough.
If your model is not rigged yet, you can rig it by hand, use Rigify in Blender, or use an auto rigging tool. Bake3D rigs the model during generation and adds a short first animation for free.
Way 1: Keyframe animation by hand
This is the classic method. You pose the rig at key moments. The software fills in the frames in between.
Here is a simple loop in Blender:
- Select the armature and switch to Pose Mode.
- Go to frame 1. Pose the character. Press I to insert a keyframe.
- Go to frame 12. Make the next pose. Insert a keyframe again.
- Go to frame 24. Copy the frame 1 pose here, so the loop closes cleanly.
- Press play. Open the Graph Editor to smooth the curves and fix sudden jumps.
Keyframing gives you full control. It is the best choice for acting, for style and for anything unusual. It is also the slowest. Polished character motion can take hours of work for just a few seconds on screen.
A few habits help a lot:
- Ease in and ease out. Real things speed up and slow down. Flat, even motion looks robotic.
- Follow arcs. Heads, hands and tails move in curves, not straight lines.
- Let loose parts lag. Ears, tails and antennas should follow a few frames behind the body.
- Show weight. A heavy body sinks a little when a foot lands.
Way 2: Motion libraries and presets
A motion library is a collection of finished moves, like walk, run, jump and wave. You apply one to your rigged model, and it plays.
The best-known free library is Adobe Mixamo. It is fast and easy, but it only works on humanoid characters: two legs, two arms, one head. For animals and creatures, see our list of Mixamo alternatives.
Bake3D’s presets are written against body parts, not bone names. So “walk” finds the legs on a dog, a spider or a robot and fits the steps to that rig. The current presets are:
| Group | Presets |
|---|---|
| Any body | Idle (breathe), Look around, Nod, Shake head |
| Legged | Walk, Trot, Run and Jump, each fit to the rig’s own legs |
| Humanoid | Wave |
| Creatures | Tail wag, Flap (hover), Slither, Swim |
| Objects | Roll, Bounce, Pulse |
Presets cost 0 credits. They run in your browser.
The trade-off with any library is that everyone has the same moves. Use library motion as a base, then adjust timing or add your own poses on top.

Way 3: Motion capture
Motion capture, or mocap, records a real performer and copies the movement onto a rig. There are two kinds.
- Suits and markers. A performer wears sensors or reflective markers. The result is very accurate. The gear is costly.
- Video-based AI capture. You film a person with a normal camera. An AI tool guesses the pose in each frame. It is cheap and quick, but hands, feet and fast moves often need cleanup.
Mocap is great for natural human motion, like sports, dance and fighting. It is hard to use for a dragon, a snake or a car, because you cannot put a suit on those.
Way 4: Describe the motion in words
The newest method is to write what you want. For example: “Walk forward four steps, stop, look left, then sit down.” A program reads the text and creates the keyframes on your rig.
In Bake3D, a described motion works like this:
- You type the motion. Say the action, the energy, the timing, and whether the body should travel or stay in place.
- Bake3D writes a motion program. It moves joints by their role, like “front left leg” or “tail”, so it fits your model’s own body.
- The engine plays the program. The same program on the same rig always gives the same pose at the same time. There is no guessing during playback.
- You watch it, then ask for changes or an optional visual critique.
A described motion costs 10 credits. A critique round costs 5. It is a good fit for non-human bodies and for motions no library has, like “flap the left wing twice, then glide”.
Which method should you use?
| Method | Speed | Skill needed | Body types | Cost |
|---|---|---|---|---|
| Keyframes by hand | Slow | High | Any | Free in Blender, plus your time |
| Motion library | Fast | Low | Mostly humanoid | Often free |
| Motion capture | Medium | Medium | Mostly humanoid | Free apps to costly suits |
| Described motion | Fast | Low | Any rig with labeled parts | Credits per motion |
A common mix is to start with a preset or a described motion, then polish key poses by hand.
In place or moving forward?
Walks and runs can be exported two ways. This matters a lot for games.
- In place. The character walks on the spot, like on a treadmill. Your game code moves it through the world. This is simple and common.
- Root motion. The animation itself carries the character forward. The engine reads that travel and moves the character. Feet match the ground better, but your code must support it.
Bake3D exports either way. With root motion turned on, the forward travel is stored on a ground-level joint called motion_root. With it off, the character stays in place, but jumps and wheel spins are kept.
Export the animation
Most engines want the motion “baked”. That means every joint has a stored value on every frame, so no special rig controls are needed.
- GLB keeps the mesh, textures, skeleton, skin weights and baked clips in one file. Blender, Godot, three.js and many web viewers read it directly. See what a GLB file is.
- FBX is the classic choice for Unity and Unreal. Bake3D writes one baked clip per FBX file. To move an existing file from one format to the other, see GLB to FBX.
Pick 24, 30 or 60 frames per second to match your project. Then follow the import guide for Blender, Unity, Unreal Engine or Godot.
Common problems and quick fixes
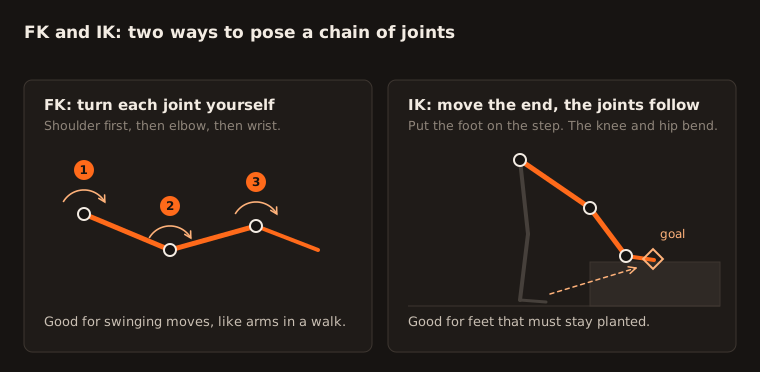
- Feet slide on the floor. The stride does not match the travel speed. Use IK on the legs, or pick root motion.
- The loop pops. The last frame does not match the first. Copy the first pose to the end.
- Skin tears or pinches at a joint. This is a weight problem, not an animation problem. Fix the skin weights.
- The model is 100 times too big or small. The two programs use different units. Set the scale at export or import. See the unit notes in the GLB to FBX guide.
- Parts pass through each other. Reduce the swing on that joint, or add a limit.
For four-legged characters, the order the feet hit the ground matters too. Our quadruped walk cycle guide gives the exact footfall order and timing.
Questions people ask
Can I animate a 3D model without rigging it?
Yes, if it moves as one solid piece. You can spin a coin, bounce a ball or drive a car body by moving the whole object. Anything that bends, like legs, tails or faces, needs a rig or shape keys first.
What is the easiest way to animate a 3D model?
Use a ready-made motion or describe the motion in words. Both skip posing by hand. Motion libraries are fastest for human characters. Described motion also works for animals, creatures and machines, as long as the rig labels its legs, wings or wheels.
Can AI animate a 3D model?
Yes. AI can rig a model, capture motion from a video, or turn a written description into keyframes. Always watch the result at full speed and frame by frame. Look for feet that slide, parts that pass through each other and jumps where the loop restarts.
What frame rate should I use for 3D animation?
Film often uses 24 frames per second. Games, apps and the web often use 30 or 60. Pick the rate your engine or video expects. Bake3D exports at 24, 30 or 60 frames per second.
Is Blender good for animation?
Yes. Blender is free and has a full set of animation tools, including keyframes, a Graph Editor for smooth motion, inverse kinematics and the Nonlinear Animation editor for mixing clips.
Sources
About this guide
Written and kept up to date by the Bake3D team. We build a tool that turns one image into a textured, rigged and animated 3D model, and we test the steps in our guides on our own files. First published . See how we write and check guides, or send a correction to hello@bake3d.ai.
Keep reading
Rigging basics
What Is Rigging in 3D Animation?
Rigging gives a 3D model a skeleton so it can move. Learn what bones, joints, skin weights and weight painting are, with simple examples.
Animation
Quadruped Walk Cycle: How Four-Legged Animals Walk
The footfall order of a dog, cat or horse walk cycle, with timing you can copy. Also covers the trot, the gallop and six- and eight-legged walks.
Rigging tools
Mixamo Alternatives for Animals, Creatures and Robots
Mixamo only rigs humanoids. Compare free and paid Mixamo alternatives, from AccuRIG and Rigify to AI tools, by the body types they can rig.