What Is Rigging in 3D Animation?
A 3D model is a hollow shell until you rig it. Rigging adds a skeleton inside and tells the skin how to follow it. This guide explains every part in plain words.
By the Bake3D teamUpdated 8 min read
Short answer
Rigging is the step that makes a 3D model movable. You place a skeleton of joints inside the model, then give every point on the surface a skin weight that says which bones pull it and how hard. After that, an animator can pose the model by rotating joints instead of moving thousands of points by hand.
How we checked this: The examples use real numbers from Bake3D's own rigs, such as the sample fox on our home page (60,000 triangles, 28 joints). The terms follow the Blender manual and the glTF 2.0 specification, which are linked at the end.
Think of a clay figure for stop-motion films. Inside the clay there is a wire frame. You bend the wire, and the clay bends with it. A 3D rig works the same way. The wire is a set of joints. The clay is the mesh, the surface made of many small triangles.
Without a rig, the only way to bend a 3D arm is to move each point of the surface yourself. Our sample fox has 41,822 of those points. Nobody wants to move them one by one. With a rig, you turn one elbow joint, and hundreds of points follow in a smooth curve.
What a rig is made of
Every rig, simple or complex, is built from the same few pieces.
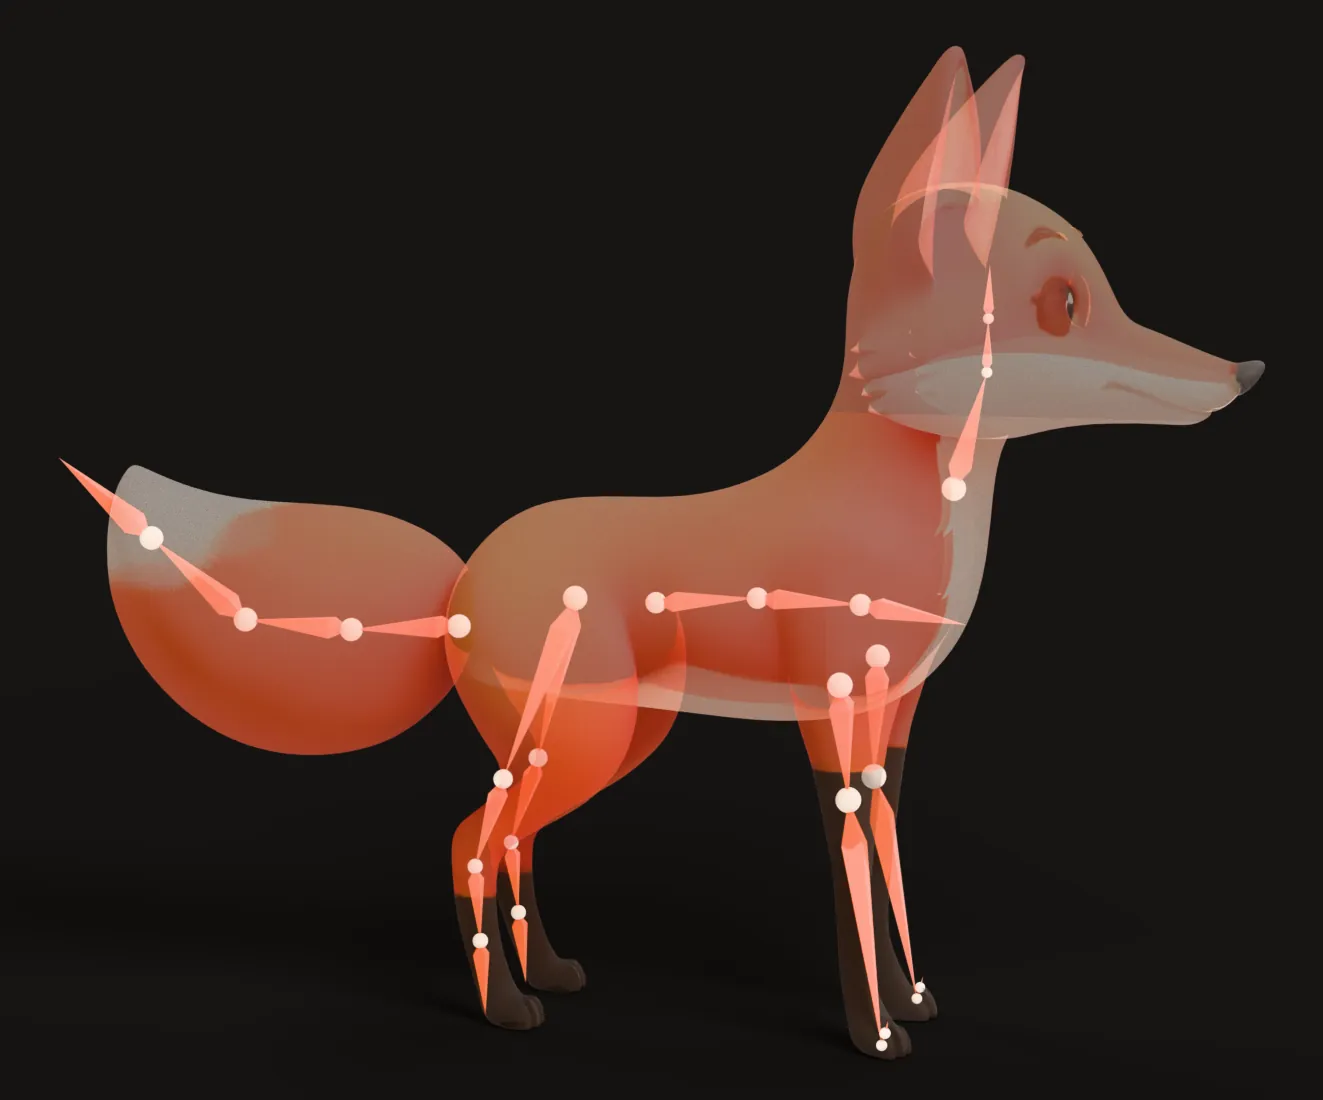
Bones and joints. A bone is a straight segment. The point where it turns is the joint, also called the pivot. In Blender, a group of bones is called an armature. Our fox has 28 joints, from the hips to the tip of the tail.
A hierarchy. Bones are linked in a family tree. The upper arm is the parent of the forearm. The forearm is the parent of the hand. When you rotate a parent, its children come along. That is why lifting a shoulder also lifts the hand.
A root. One bone sits at the top of the tree, usually at the hips or the base of the object. Moving the root moves the whole model through the scene.
Skin weights. Each point on the mesh stores small numbers that say which bones pull it. A point in the middle of the forearm might follow the forearm bone 100%. A point right at the elbow might follow the upper arm 50% and the forearm 50%. The weights for one point add up to 1. This part of rigging is called skinning.
Controls. Animators rarely grab bones directly. They grab controls, which are easy handles outside the mesh. A foot control can plant the foot on the ground while the knee bends on its own.
Shape keys. Faces often need more than bones. Shape keys, also called blend shapes or morph targets, store a whole new shape, like a smile. The animator mixes them in with a slider.
How rigging works, step by step
Most rigs are built in the same order, whether a person or a program does it.
- Start from a rest pose. The model stands still in a neutral pose. Arms are out to the side or angled down. For more on this, see A-pose vs T-pose.
- Place the joints. Each joint goes where the real bend happens. A knee joint sits inside the knee, not in front of it.
- Build the chains. Joints connect into chains: a leg, a spine, a tail. Each chain gets a clear start and end.
- Bind the skin. The software gives every point a first set of weights. Blender calls this “With Automatic Weights”.
- Fix the weights. You test poses and repair spots where the skin tears, pinches or follows the wrong bone.
- Add controls. You add inverse kinematics, limits and handles so animation is quick and safe.
- Test hard poses. Bend each joint far. Turn the head. Crouch. Anything that breaks now will break in the final animation.
What is weight painting?
Weight painting is how you see and fix skin weights. You pick one bone. The mesh turns into a heat map. In Blender, red means the point follows that bone fully. Blue means it ignores that bone. Green and yellow are in between.
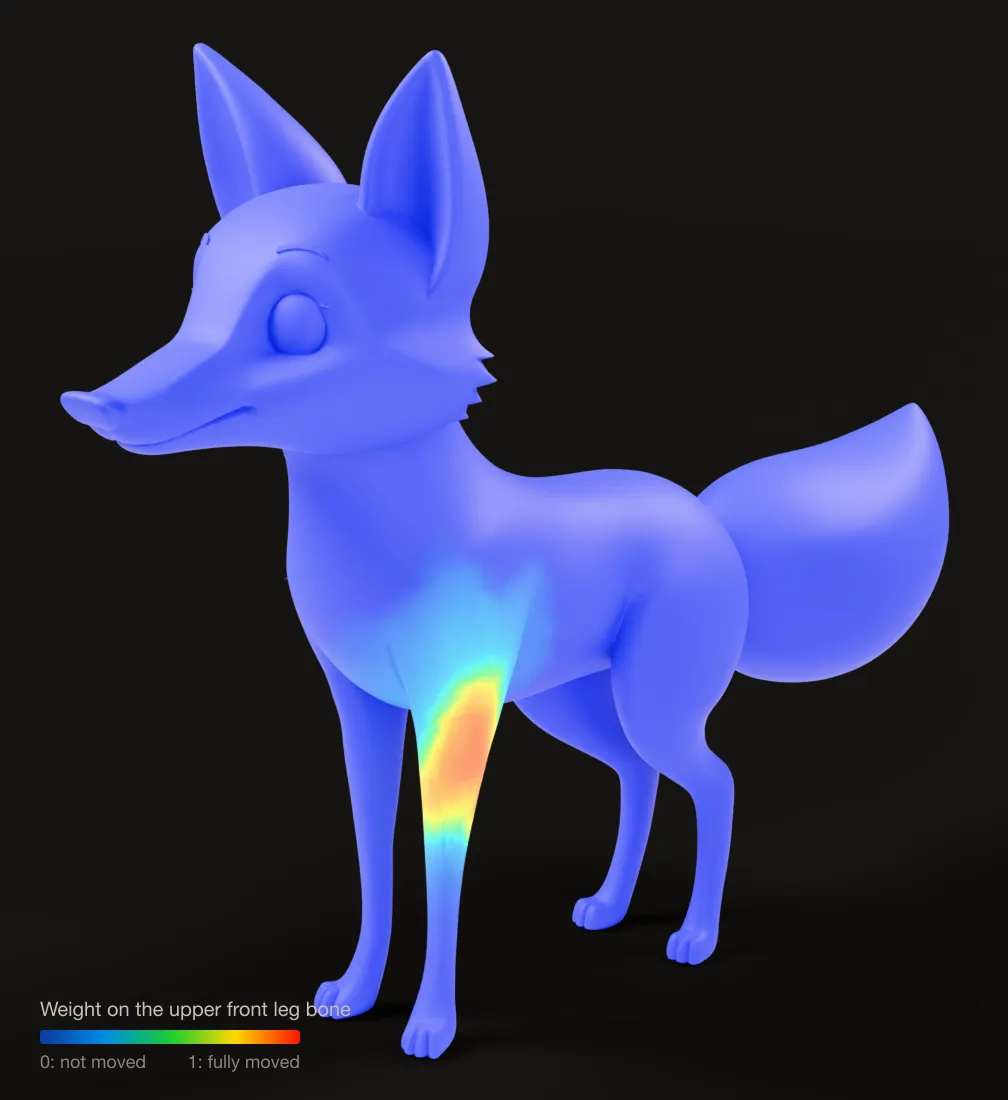
You paint with a brush to add or remove influence. Common fixes are:
- A shoulder that pulls part of the chest when the arm lifts.
- A thigh that drags the belly with it.
- A tail bone that pulls a leg because the two sit close together.
Good weights change smoothly across a joint. A sharp jump from red to blue makes a hard crease. A wide, soft blend makes a rubbery bend. Rigid parts are the exception. A robot plate or a car door should follow one bone 100%, with no blend at all.
Rigging vs skinning vs animation
These three words get mixed up a lot. Here is how they differ.
| Step | What it does | What you get |
|---|---|---|
| Rigging | Builds the whole movable setup: joints, chains, controls | A model you can pose |
| Skinning | Ties each surface point to bones with weights | Skin that bends with the joints |
| Animation | Poses the rig over time | Motion, stored as keyframes |
A rigger builds the puppet. An animator plays it. In small teams and in solo projects, one person often does both.
FK and IK in plain words
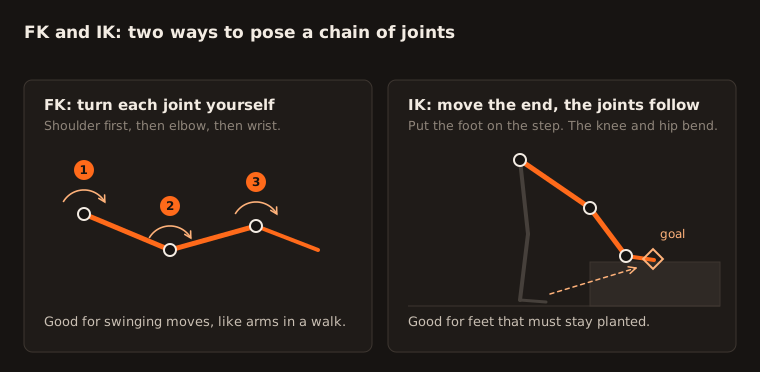
There are two ways to pose a chain of joints.
Forward kinematics (FK) means you rotate each joint yourself, from the top down. Shoulder, then elbow, then wrist. It is great for swinging motions, like arms during a walk.
Inverse kinematics (IK) means you move the end of the chain, and the software works out the joints above it. Put the foot on a step, and the knee and hip bend to match. It is great for feet that must stay planted.
Most character rigs use IK for legs and a mix of FK and IK for arms.
Rigs for different body types
A human rig is only one kind. Real projects need many more.
- Four-legged animals need four leg chains, a spine that can bend and twist, a neck and often a tail. The legs of a dog bend in a different pattern than a human leg.
- Birds and dragons need wing chains that fold and spread.
- Snakes, tails and tentacles are long chains with many small joints, so they can curve smoothly.
- Insects and spiders need six or eight leg chains that work together.
- Machines and vehicles are mostly rigid. Each wheel, door or arm segment follows one joint fully and turns around a fixed axis, like an axle or a hinge.
Bake3D names each chain by its role instead of a fixed bone name. The roles include leg, arm, spine, neck, tail, wing, tentacle, fin, ear and antenna. That way, a motion like “walk” can find the legs on a dog, a spider or a robot, whatever their bones are called. You can read how this works for four-legged animals in rig a quadruped from one image.
How to tell if a rig is good
A rig can look fine in its rest pose and still fail in motion. Test it before you animate.
- Bend each knee and elbow about 90 degrees. The joint should fold, not collapse into a thin crease.
- Twist the forearm or the neck. Watch for a “candy wrapper” twist, where the skin pinches into a narrow band.
- Lift each leg. Nothing else should move, except parts that should, like the hip.
- Move the root. The whole model should travel as one piece.
- For rigid parts, turn a wheel or open a door. It should spin around its real axis without bending.
Our rig checklist goes deeper and covers what AI-made rigs tend to get wrong.
Ways to get a rig
You have four main options. They trade time for control.
| Option | Good for | Watch out for |
|---|---|---|
| Rig by hand in Blender or Maya | Full control, unusual shapes, hero characters | Takes practice and hours of work |
| Rigify in Blender | Humans and some animals, with good controls | You still place the bones yourself |
| Auto riggers like Mixamo | Humanoid characters in minutes | Most only accept two-legged, two-armed bodies |
| AI rigging tools | Fast rigs for many body types | Always check weights and joint positions |
To go further, read how to rig a character in Blender, how auto rigging works or our comparison of Mixamo alternatives for animals and creatures.
Rigging words at a glance
| Word | Meaning |
|---|---|
| Armature | Blender’s name for a skeleton |
| Bone | One straight segment of the skeleton |
| Joint or pivot | The point a bone turns around |
| Rest pose | The neutral pose the skin was bound in |
| Skin weights | Numbers that tie mesh points to bones |
| Weight painting | Fixing skin weights with a brush |
| IK | Move the end of a chain; the joints follow |
| FK | Rotate each joint one by one |
| Shape keys | Stored shapes mixed with a slider, often for faces |
| Retargeting | Copying motion from one rig to another |
When you are ready to try it, the image to 3D workflow builds the mesh and the rig from one picture, and you can inspect every joint before you export.
Questions people ask
What does rigging mean in animation?
Rigging means building the controls that move a 3D model. It usually has two parts. First you add a skeleton of joints. Then you connect the surface of the model to those joints with skin weights, so the skin bends when a joint turns.
What is the difference between rigging and skinning?
Rigging is the whole job of making a model movable. Skinning is one part of it. Skinning is the step where each point on the mesh gets weights that tie it to one or more bones.
Do I need to rig a model to animate it?
Not always. A rigid object like a box, a coin or a car body can move as one piece without a rig. Anything that bends, like a leg, a tail or a face, needs a rig or shape keys.
Is rigging hard to learn?
The basics take an afternoon. Placing bones and using automatic weights in Blender is quick to learn. Good weights at shoulders, hips and faces take practice. An auto rigging tool can do the first pass for you.
What file formats keep a rig?
GLB, glTF and FBX can store a skeleton, skin weights and animation. OBJ and STL cannot. They only hold the shape. See what a GLB file is for details.
Sources
About this guide
Written and kept up to date by the Bake3D team. We build a tool that turns one image into a textured, rigged and animated 3D model, and we test the steps in our guides on our own files. First published . See how we write and check guides, or send a correction to hello@bake3d.ai.
Keep reading
Rigging
Auto Rigging: How to Rig a 3D Model Automatically
How auto rigging tools place bones and skin weights for you, which body types they can handle, and how to check an auto rig before you animate.
Blender
How to Rig a Character in Blender
Rig a character in Blender step by step. Compare hand-placed bones, Rigify and auto rigging, then fix bad weights and export a clean rig.
Rigging
How to check an AI-generated 3D rig
Review geometry, joint placement, skin weights, motion and export quality before using an AI-generated character or object in production.