How to Rig a Character in Blender
Blender has everything you need to rig a character for free. You can place every bone by hand, let Rigify build a full animation rig from a template, or use an auto rigger. This guide walks through all three, then shows how to fix the weights and export the result for a game engine.
By the Bake3D teamUpdated 7 min read
Short answer
To rig a character in Blender, add an armature and place bones inside the body, or use the free Rigify add-on to generate a full rig from a template. Then select the mesh, add the armature to the selection, and press Ctrl+P and choose With Automatic Weights. Test poses in Pose Mode, fix problem areas in Weight Paint mode, and export the rigged model as GLB or FBX.
How we checked this: The menu paths, shortcuts and Rigify details follow the Blender manual for Blender 5.2 LTS, read on 25 September 2026. The Rigify template list comes from the manual and Blender's own source code. The Auto-Rig Pro details come from its store page. The export notes match what we see when we import Bake3D rigs into Blender.
Rigging turns a still model into a puppet. In Blender, the puppet’s skeleton is called an armature, and each part of it is a bone. If these words are new, read what rigging is first. It takes five minutes and makes the steps below much easier to follow.
Three ways to rig in Blender
| Way | Best for | Time | Cost |
|---|---|---|---|
| Place bones by hand | Simple characters, props, machines, learning | Medium | Free |
| Rigify | People and animals that need a full animation rig | Medium | Free, built in |
| Auto rigger | Humanoids you want rigged fast | Fast | Paid add-on or outside tool |
Before you start: prepare the model
A clean model rigs much better. Do these steps first.
- Stand the model at the center, with its feet on the ground.
- Use real-world size. Rigify expects one Blender unit to equal one metre.
- Apply the scale and rotation. Select the model and press Ctrl+A, then choose All Transforms.
- Use a neutral pose, with arms and legs away from the body. See A-pose vs T-pose.
- Clean the mesh. In Edit Mode, select everything and use Mesh, Clean Up, Merge by Distance to remove doubled points.
Way 1: Rig a character by hand
This is the best way to learn, and it works for any shape.
- Add an armature. In Object Mode, press Shift+A and choose Armature. One bone appears at the 3D cursor.
- See the bones through the mesh. In the armature’s Object Data tab, under Viewport Display, turn on In Front.
- Build the spine. Press Tab for Edit Mode. Move the first bone to the hips. Select its tip and press E to extrude new bones up through the spine, the neck and the head.
- Add the legs and arms. Extrude from the hips down to the knees, ankles and toes. Extrude from the upper chest out to the shoulders, elbows and wrists.
- Name the bones. Give left and right bones matching names ending in .L and .R, like
thigh.Landthigh.R. Build one side, then use Armature, Symmetrize to copy it to the other side. - Fix the bone roll. Select all bones and press Shift+N to recalculate the roll, so the bones twist the right way.
- Bind the mesh. Go back to Object Mode. Click the mesh, then Shift-click the armature so it is active. Press Ctrl+P and choose With Automatic Weights.
- Test it. Select the armature and press Ctrl+Tab for Pose Mode. Rotate bones with R. Watch the knees, elbows, shoulders and hips.
Add inverse kinematics to the legs
Inverse kinematics, or IK, lets you move a foot and have the knee and hip follow.
- In Edit Mode, add a new bone at the ankle that is not connected to the leg. Name it
foot_ik.L. - In Pose Mode, select the shin bone.
- In the Bone Constraints tab, add Inverse Kinematics.
- Set the Target to the armature and the Bone to
foot_ik.L. - Set Chain Length to 2, so only the shin and thigh follow.
- Add a knee control as the Pole Target to decide which way the knee points.
Way 2: Rig with Rigify
Rigify is a free rig generator that comes with Blender. You start from a template called a meta-rig, fit it to your model, and Rigify builds a complete rig with animation controls.
- Turn it on. Go to Edit, Preferences, Add-ons, search for Rigify and enable it.
- Add a meta-rig. Press Shift+A, choose Armature, and pick a template. The Blender manual lists Basic Human, Basic Quadruped, Human, Cat, Wolf, Horse and Shark. Blender’s source code also includes a Bird.
- Fit it to your model. Scale the meta-rig to about the right size. In Edit Mode, move each joint to the right spot inside the body. Turn on X-Axis Mirror so the left and right sides move together.
- Generate the rig. In the armature’s Object Data tab, open the Rigify panel and click Generate Rig.
- Bind the mesh. Click the mesh, Shift-click the new generated rig, press Ctrl+P and choose With Automatic Weights.
- Test the controls. The generated rig has colored handles for the arms, legs, torso and fingers.
Rigify builds the bones and controls, but it does not create skin weights. That is why step 5 is needed. The generated rig has three kinds of bones: DEF bones bend the mesh, while ORG and MCH bones are helpers.
Way 3: Use an auto rigger
If you have many humanoid characters to rig, an auto rigger saves a lot of time.
- Auto-Rig Pro is a paid Blender add-on. The full version costs $50 and the lite version $25. Its Smart feature places humanoid bones for you. For animals and spiders, you place its modular limbs yourself.
- Mixamo is free and rigs humanoids on the web. Export an FBX from Blender, rig it in Mixamo, then import the result back into Blender.
- Other tools rig animals and creatures too. Our Mixamo alternatives guide compares them.
Fix the weights with weight painting
Automatic weights are a starting point. A few areas usually need help.
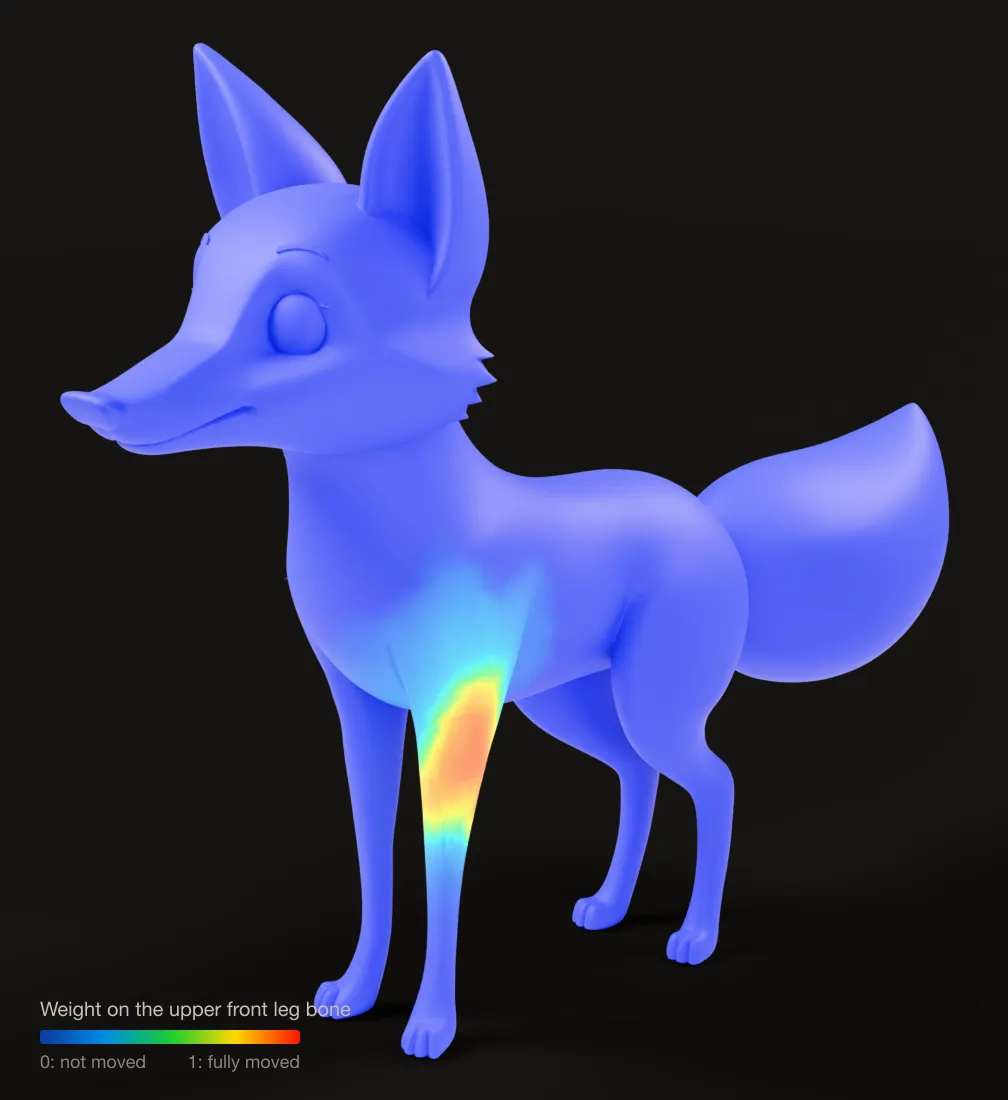
- Click the armature, then Shift-click the mesh.
- Switch to Weight Paint mode.
- Ctrl-click a bone to see its weights. Red means full influence. Blue means none.
- Use the brush to add weight where the bone should pull, and subtract where it should not.
- Use the Blur brush to smooth the change across a joint.
- Turn on Auto Normalize so the weights on each point always add up to 1.
Common fixes:
- The chest follows the arm when the arm lifts. Remove the upper arm’s weight from the chest.
- The belly follows the thigh. Remove the thigh’s weight from the belly.
- A joint folds into a thin crease. Blur the weights across the joint.
- A rigid part, like armor or a helmet, bends. Give it 100% to one bone.
Fix common Blender rigging problems
- “Bone Heat Weighting: failed to find solution for one or more bones.” Merge doubled points by distance, separate loose parts, apply the scale, or scale the model up and bind again.
- Parts of the mesh do not move. Those points have no weights. Check the mesh’s vertex groups, or paint weight onto them.
- The mesh jumps or twists when you pose it. Recalculate the bone roll with Shift+N in Edit Mode, then bind again.
- Moving the armature leaves the mesh behind. The mesh needs an Armature modifier that points to your armature.
- The mesh follows the wrong bone. Vertex group names must match bone names exactly.
Rig animals and machines in Blender
- Four-legged animals: start from Rigify’s Basic Quadruped, Cat, Wolf or Horse template. The hind leg has an extra segment, and the joint that points backward is the ankle.
- Machines and vehicles: do not use automatic weights. Add one bone per moving part, then parent each rigid part straight to its bone with Ctrl+P, Bone. Place wheel bones at the axle and door bones at the hinge.
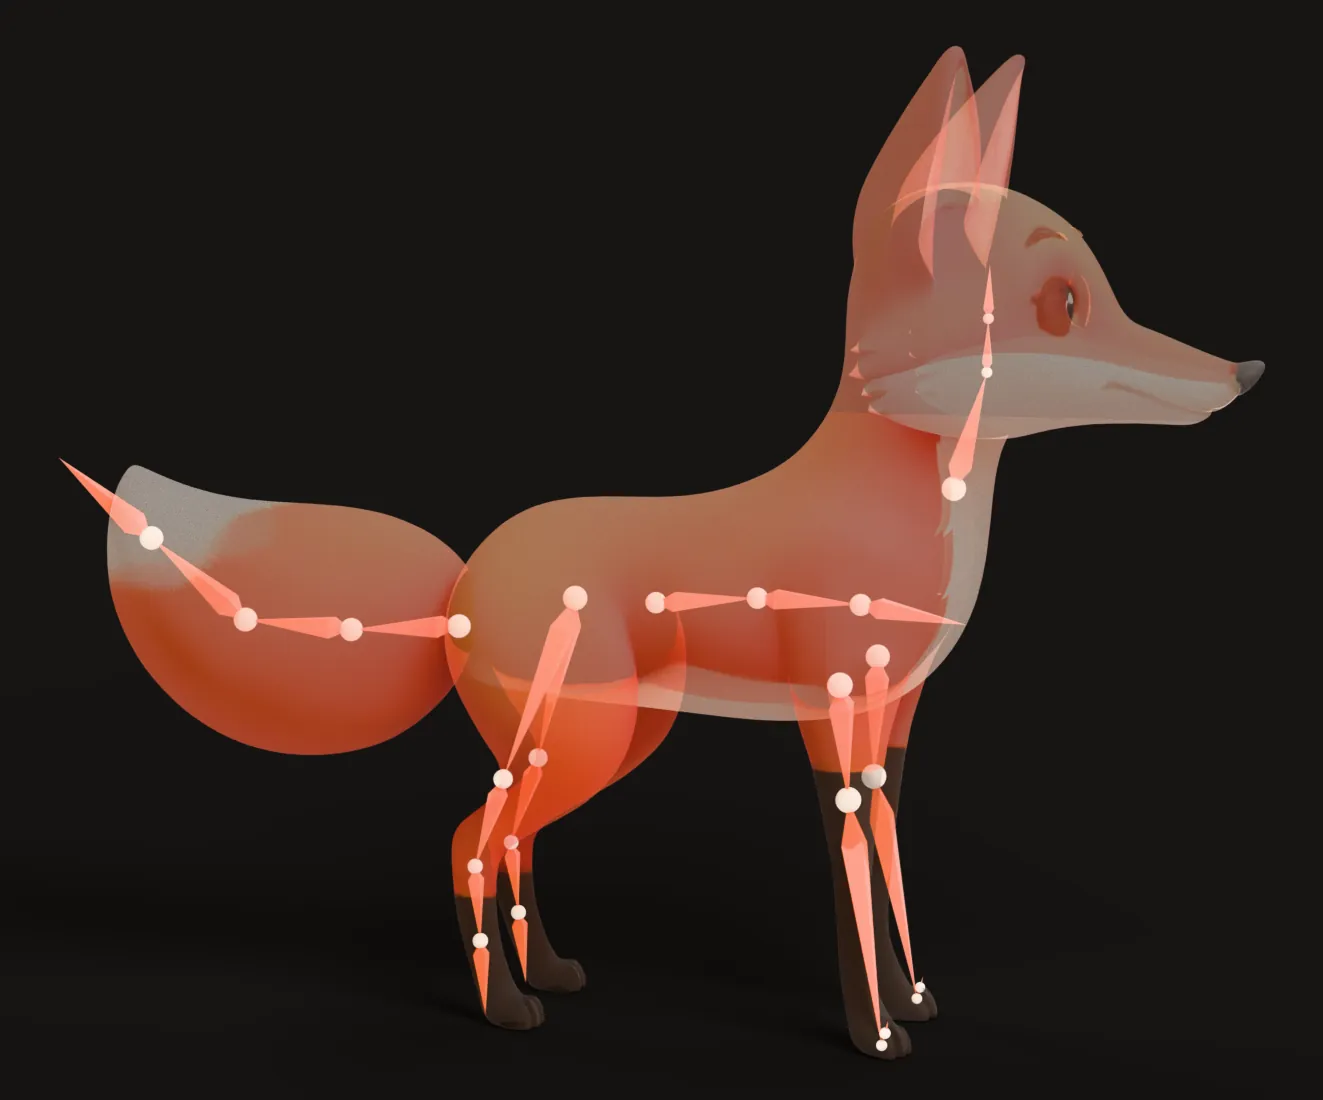
For more on four-legged motion, see our quadruped walk cycle guide.
Export the rigged character
- GLB for the web, Godot and many other tools: File, Export, glTF 2.0. For a Rigify rig, turn on the option to export deformation bones only.
- FBX for Unity and Unreal Engine: see how to convert GLB to FBX for the settings that matter.
Bake the animation before export if it uses IK or constraints. glTF and FBX store the baked result, not the controls.
If you would rather skip the manual work, Bake3D makes and rigs a model from one picture, for people, animals, creatures and machines. The rig comes into Blender as a normal armature with skin weights. See import a rigged GLB into Blender.
Questions people ask
Is rigging in Blender free?
Yes. Blender is free, and it includes Rigify, a rig generator with templates for people and animals. Paid add-ons like Auto-Rig Pro can speed up the work, but you do not need them.
What does "With Automatic Weights" do?
It gives every point on the mesh a starting weight for each nearby bone, based on distance. It is a quick first pass. You will usually fix a few areas, like the shoulders and hips, by hand afterward.
Why does Blender say "Bone Heat Weighting failed"?
Automatic weights could not work out the weights for some bones. Common causes are overlapping or doubled points, separate loose parts, or a model that is very small. Try merging points by distance, applying the scale, or scaling the model up and trying again.
Does Rigify work for animals?
Yes. Rigify ships starter rigs for a basic quadruped, a cat, a wolf, a horse and a shark, and its source code also includes a bird. You fit the template to your model, then generate the rig.
How do I export a Rigify rig to a game engine?
Rigify builds many helper bones. Only the bones whose names start with DEF bend the mesh. When you export to glTF, turn on the option to export deformation bones only, and bake the animation so the helper bones are not needed.
Sources
About this guide
Written and kept up to date by the Bake3D team. We build a tool that turns one image into a textured, rigged and animated 3D model, and we test the steps in our guides on our own files. First published . See how we write and check guides, or send a correction to hello@bake3d.ai.
Keep reading
Rigging basics
What Is Rigging in 3D Animation?
Rigging gives a 3D model a skeleton so it can move. Learn what bones, joints, skin weights and weight painting are, with simple examples.
Rigging
Auto Rigging: How to Rig a 3D Model Automatically
How auto rigging tools place bones and skin weights for you, which body types they can handle, and how to check an auto rig before you animate.
Blender
Import a rigged, animated GLB into Blender
Import a rigged, animated GLB into Blender with the Bake3D add-on or by hand, then check the armature, textures and every animation before you edit it.