How to Make a Lithophane From a Photo
A lithophane looks like a plain white plate until you shine a light behind it. Then a photo appears, soft and glowing. This guide takes you from a photo on your phone to a finished, lit lithophane, with settings that work on a normal home 3D printer.
By the Bake3D teamUpdated 6 min read
Short answer
To make a lithophane, turn a photo into an STL where dark areas are thick and light areas are thin. Use a lithophane maker, set a minimum thickness of about 0.8 mm and a maximum of about 3 mm, and print it standing up in white PLA with solid infill and fine layers, about 0.12 mm. Put a cool white LED about 30 mm behind it, and the photo appears.
How we checked this: The tool steps and default values come from Bake3D's free lithophane maker, whose output is checked by automated tests for closed edges, correct size and positive volume. The print settings are gathered from published lithophane guides and from Bambu Lab's and Cura's own documentation, all linked below. We did not certify them on every printer and filament.
Lithophanes are older than photography as most people know it. A French baron, Paul de Bourgoing, patented the modern way of making them in 1827. Porcelain factories like Meissen and KPM Berlin then made them by the thousands. The name comes from Greek words meaning “stone” and “to appear”. A 3D printer can make one in an afternoon.
How a lithophane works
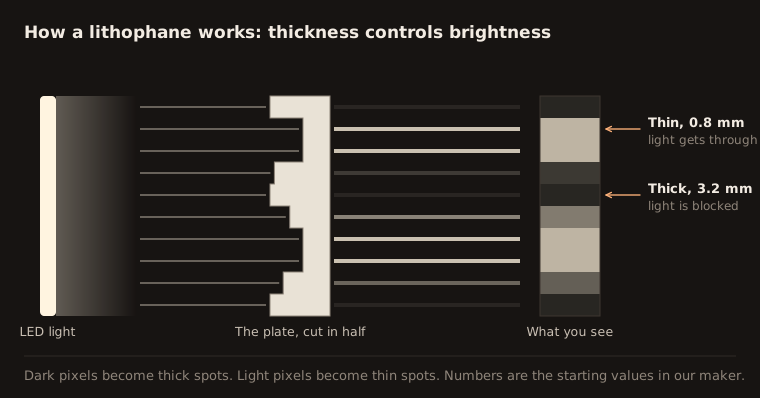
The whole trick is thickness.
- Thick plastic blocks light, so it looks dark.
- Thin plastic lets light through, so it looks bright.
A lithophane maker reads your photo one pixel at a time. It turns each dark pixel into a thick spot and each light pixel into a thin spot. With no light behind it, you see a white, bumpy plate. Turn on a light, and the photo appears.
What you need
- A 3D printer. Any normal filament (FDM) printer works.
- White or natural PLA filament.
- A photo.
- A light: an LED strip, a small LED panel or a tea light.
- A lithophane maker. Ours is free and runs in your browser.
Step 1: Pick the right photo
Some photos make great lithophanes. Others turn into a grey mess. Look for these things:
- Good contrast. Clear darks and clear lights. A flat, grey photo prints flat and grey.
- A simple background. Busy backgrounds fight with the subject for attention.
- A big subject. Faces should fill much of the frame. Tiny faces lose their eyes.
- Soft, even light on the subject. Harsh flash shadows become thick, dark patches.
- Not too dark overall. Very dark photos become very thick and dim.
Crop the photo before you upload it. The maker uses the whole picture, so cut away anything you do not need. A small boost in contrast in any photo app often helps.
Step 2: Make the lithophane STL
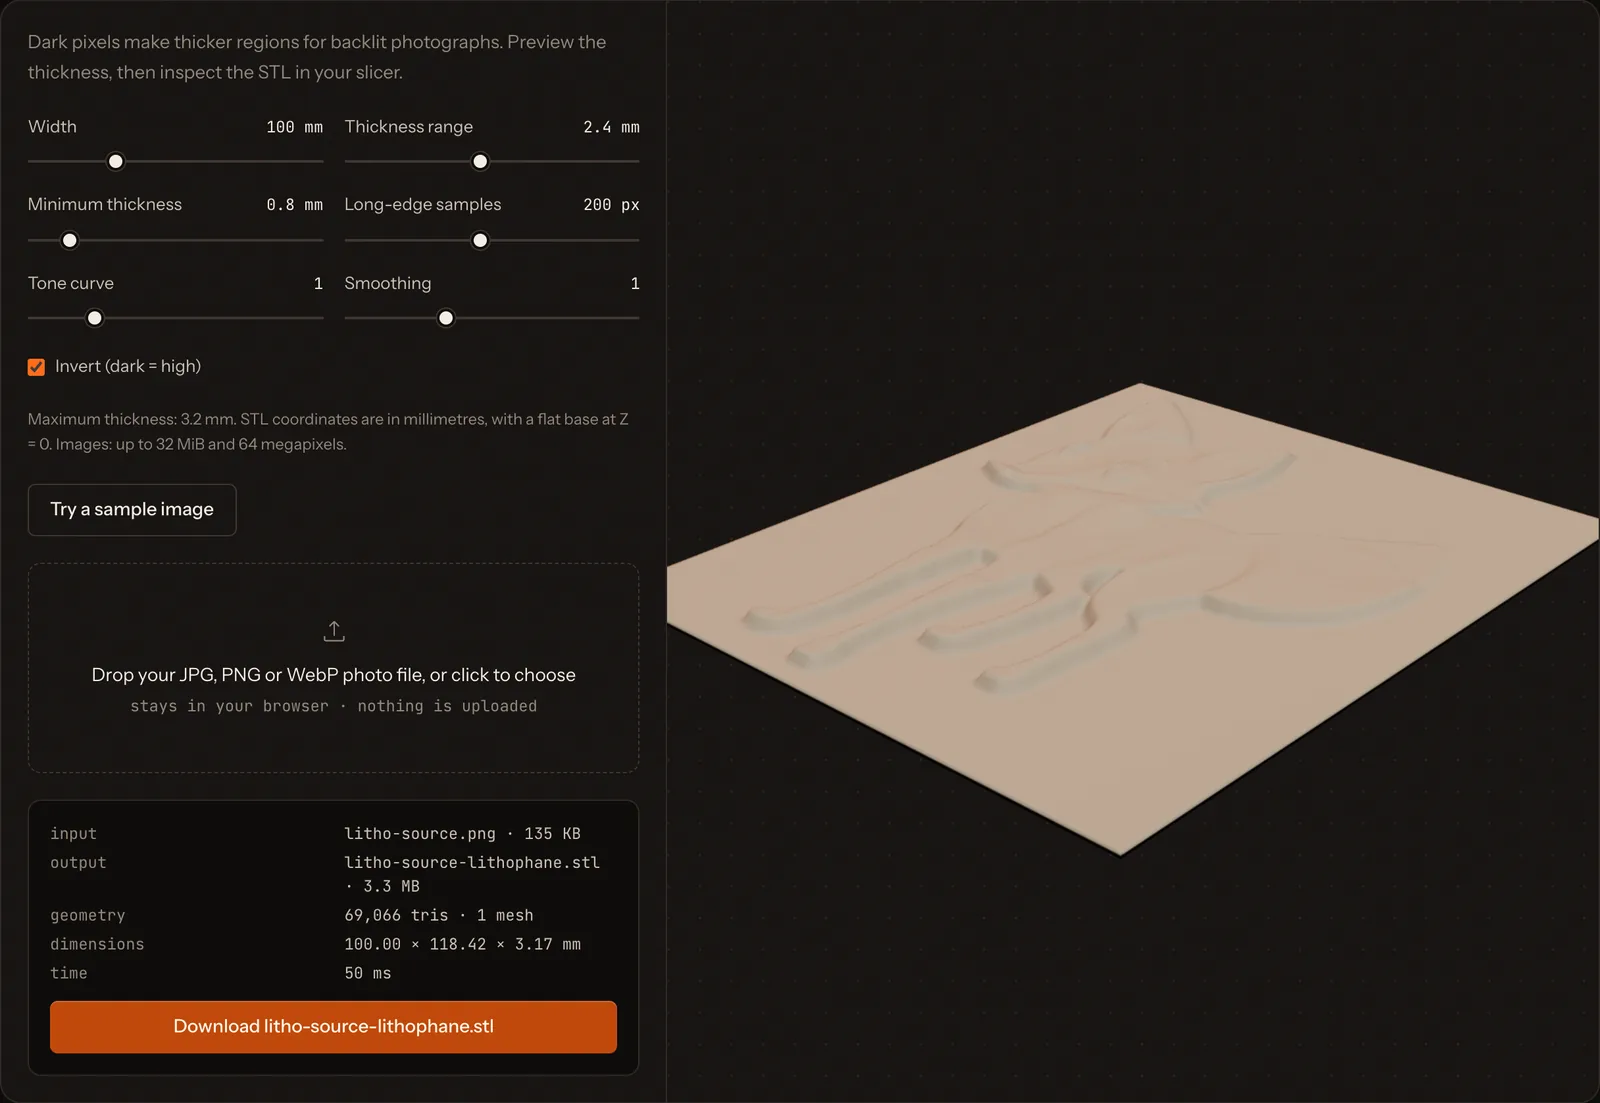
- Open our free lithophane maker. It reads JPG, PNG and WebP.
- Drop in your photo.
- Set the width in millimetres. The height follows the photo’s shape. It starts at 100 mm.
- Check the minimum thickness. This is the thinnest, brightest part. It starts at 0.8 mm.
- Check the thickness range. This is how much thicker the darkest parts get. It starts at 2.4 mm, so the thickest spot is 3.2 mm.
- Keep invert on, so dark pixels become thick.
- Adjust the tone curve if the midtones look too dark or too light.
- Download the STL.
The file is in millimetres with a flat base, ready for any slicer. Nothing is uploaded; the whole job runs on your computer.
Our maker makes flat panels. For curved panels, lamp shapes, boxes and frames, other free lithophane makers exist, and Bambu Lab’s MakerWorld has a web tool called Make My Lithophane.
Step 3: Set up the slicer
These settings come from published lithophane guides. Treat them as a starting point.
| Setting | Start with | Why |
|---|---|---|
| Orientation | Standing up, not lying flat | Fine vertical layers give a much smoother picture |
| Layer height | 0.12 mm | Finer layers mean finer steps of brightness |
| Infill | 100%, or many walls | Any gap or pattern inside shows up as a shadow |
| Brim | Yes, about 18 to 20 lines | Helps a tall, thin panel stay stuck to the bed |
| Speed | About 30 mm/s | Slow printing keeps thin walls clean |
| Filament | White or natural PLA | Light passes through evenly |
One published guide recommends 99% infill or 99 walls. Another uses at least 7 walls with low infill, and reports no visible difference. Either works. What matters is that the inside is solid.
Thickness: the setting that matters most
| Filament | Minimum thickness | Maximum thickness |
|---|---|---|
| White PLA | 0.7 to 0.9 mm | 2.8 to 3.1 mm |
| Grey PLA | 0.6 to 0.7 mm | 2.6 to 2.8 mm |
These ranges come from the Lithophane Maker beginner’s guide. The best numbers depend on your filament and your light. So print a small test piece first. Crop a strip of your photo, 30 mm wide, and print that before the full lithophane.
Step 4: Light it
- Use a cool white light. Warm light turns the picture orange.
- Keep the light about 30 mm behind the plate for a night light. Too close, and you see a bright hot spot.
- Spread the light evenly. An LED panel or a strip behind a diffuser works better than a single bulb.
- Block light around the edges with a frame, so the only light you see comes through the picture.

Flat, curved or box?
- Flat panels are the easiest to print and look great in a frame with a light behind.
- Curved panels stand up on their own and can wrap around a tea light.
- Cylinders make lamp shades.
- Boxes put a different photo on each side of a cube with a light inside.
Color lithophanes
Printers that can swap filament colors can make color lithophanes. Bambu Lab publishes an official guide. It uses four colors of its PLA Basic filament: cyan, magenta, yellow and white. It suggests a 0.2 mm nozzle and 100% rectilinear infill, and a size of 144 by 108 mm to fit its frame and light board. Its free Make My Lithophane tool creates the file.
Lithophanes in Cura, PrusaSlicer and Bambu Studio
- Cura can open a picture directly and turn it into a lithophane. Set it to “Darker is higher”. Its defaults are a 0.4 mm base and a 2.5 mm height.
- PrusaSlicer has no built-in way to turn a picture into a lithophane. Several feature requests are still open. Use a lithophane maker, then import the STL.
- Bambu Studio points users to the MakerWorld Make My Lithophane web tool, which exports a ready-to-print 3MF.
Fix common lithophane problems
- The picture looks washed out. Increase the thickness range, or move the light farther back.
- The picture is too dark. Lower the minimum thickness a little, or use a brighter light.
- You see stripes or steps. Print standing up with thinner layers.
- There are holes in bright areas. The minimum thickness is too thin for your printer. Raise it to 0.8 mm or more.
- The panel fell over. Add a wider brim, and slow down.
- The picture looks backward. Mirror the photo before you make the STL, or turn the panel around.
Want something more than a flat photo?
A lithophane is one way to print a picture. A raised relief is another. For a full 3D figure with a back and sides, you need a 3D model. Our guide on how to 3D print a picture compares all three, and how to make a figurine from a photo covers the full 3D route.
Questions people ask
What is a lithophane?
A lithophane is a thin plate with a picture hidden in its thickness. Thick parts block light and look dark. Thin parts let light through and look bright. The picture only shows clearly when light shines from behind.
What is the best filament for a lithophane?
White or natural PLA is the usual choice. Bambu Lab's own mono lithophane uses its Jade White PLA. Some makers also like light grey. Avoid dark colors and very glossy or sparkly filaments, which blur the picture.
What thickness should a lithophane be?
A common starting point for white PLA is a minimum of 0.7 to 0.9 mm and a maximum of 2.8 to 3.1 mm. Our free maker starts at 0.8 mm and 3.2 mm. Print a small test strip, because your filament and light change the result.
Can I make a color lithophane?
Yes, on a printer that can swap colors. Bambu Lab publishes a guide that uses cyan, magenta, yellow and white PLA with a 0.2 mm nozzle. Its free Make My Lithophane web tool creates the color file.
Why does my lithophane look blurry or washed out?
A blurry print usually means the layers are too thick or the print was lying flat. Print it standing up with 0.12 mm layers. A washed-out picture usually means the thickness range is too small, or the light is too strong or too close.
Sources
About this guide
Written and kept up to date by the Bake3D team. We build a tool that turns one image into a textured, rigged and animated 3D model, and we test the steps in our guides on our own files. First published . See how we write and check guides, or send a correction to hello@bake3d.ai.
Keep reading
3D printing
How to Make an STL File for 3D Printing
Five ways to make an STL file: from a photo, a logo, a quick design, an existing 3D model or an AI tool. Plus how to check it before you print.
3D printing
How to 3D Print a Picture: Relief, Lithophane or Full Model
Three ways to 3D print a photo or picture: a raised relief, a backlit lithophane or a full 3D model. Settings, checks and limits for each one.
3D printing
How to Make a Custom 3D Figurine From a Photo
Turn a photo of yourself, a pet or a character into a 3D printed figurine. Compare AI, photo scanning and paid services, then print it well.